This article details how to pair and connect a D2 WiFIRE-enabled grill to Android or iOS devices using the Traeger app. It covers pre-pairing steps, device requirements, WiFi setup, pairing methods (QR code or manual), troubleshooting errors, and FAQs, emphasizing the need for a 2.4GHz network and up-to-date device software.
PRE-PAIRING CHECKLIST
Before pairing, ensure your grill, home WiFi, and iPhone are properly set up.
-
Check Device Versions:
Android iPhone - Android v. 10 or newer.
- If you're using an older Android device, you may need to update your operating system to pair your grill successfully.
-
How to check & update your Android version (Google Support Article).
- Older Android devices may not be able to support newer operating systems. In these rare cases, a newer device will be needed.
- Pairing will not work on Samsung Galaxy S22 devices with Android 13 OS. Updating the device to Android 14 will resolve this.
- The Traeger app supports iOS 16 or newer.
- Older iPhones may not be able to support newer operating systems. You will need to use a different smart phone or upgrade the old iPhone.
- How to check iOS version (Apple Support Article).
- How to update an Apple device (Apple Support Article).
-
Devices on iOS 15 & iCloud Plus: Turn off iCloud Private Relay
- iOS 15 introduced a feature called, "Private Relay," for iCloud Plus users. This feature must be turned off while pairing the grill. It can be turned back on after successful pairing.
- Cannot find Private Relay? If you cannot find Private Relay, you don't have iCloud Plus.
-
How to Turn Off or Check for iCloud Plus/Private Relay.
- Within the phone/device settings, locate the search bar at the top of the main screen.
- Search Private Relay. Tap on Private Relay in the search results.
- If you do not see Private Relay, you do not have it. Continue the pairing process as normal.
- You should see Private Relay (Beta) followed by On or Off. If it shows Off, Private Relay has been turned off and the user can resume pairing as usual.
- To turn off Private Relay, tap the green toggle and confirm the user wants to turn off Private Relay. Once the pairing process has been complete, follow the steps above to turn Private Relay back on.
- Android v. 10 or newer.
- Check the grill's firmware, config version, & device type.
-
Disable Cellular Data, Auto Join & Bluetooth on the device.
- Shutting off Bluetooth does not apply to Touchscreen or Woodridge grills where Bluetooth is needed.
- Close out any open apps during the pairing process.
- Download the Traeger App
-
Check the Home WiFi Setup
- Walk through the checklist found in Home WiFi Setup.
-
Check the grill’s proximity to the router.
- The grill should within 30 ft from the router. (-30 to –70 dbm)
-
Has the Grill been connected to WiFi previously? (lost connection, moved, new WiFi network, second owner, etc.) When working with a WiFIRE connection you want to make sure that all past information from prior pairing attempts is cleared from the grill and the device being used for pairing. To have a clean slate when attempting to pair take these next steps.
- On the grill’s controller, navigate to Menu > WiFi Information.
- If there is a WiFi network name here, the grill is already paired to a network.
-
Forget Network
- This feature essentially logs the grill out of the network it is currently connected to, allowing you to log into a different network than the grill was on previously. See Forget Network for steps.
- Power Cycle the Grill
-
WiFi Reset
- Resetting your WiFi is a helpful option to do whenever you are connecting a grill that has been connected to a WiFi network previously. See WiFi Reset for steps.
- Begin the pairing process.
- Do this also after any unsuccessful pairing attempt.
-
Forget Network
9. Check Antenna for D2 Timberline 850 & 1300.
PAIRING INSTRUCTIONS
1. Selecting Controller 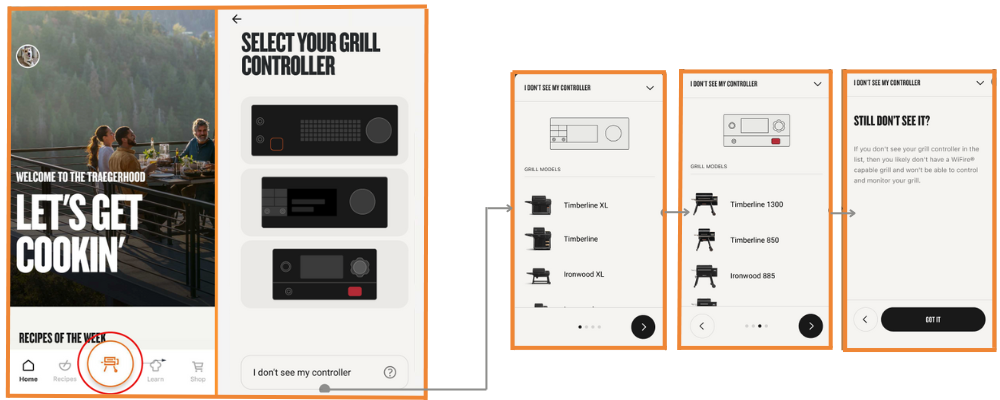
- Open the Traeger app.
Grill Icon > +Add Grill-
Pairing a second/additional grill:
- Profile icon > +Add Grill.
- Grill icon > Current grill's name > Add Grill.
-
Pairing a second/additional grill:
-
Select the controller style most similar to your grill's controller.
- If the controller on the grill is not seen, select " I don't see my controller" this will bring up a list of grills that correspond to each controller.
- If the controller is not listed, it is most likely that the grill is not WiFIRE enabled.
- Select grill to connect.
- If the controller on the grill is not seen, select " I don't see my controller" this will bring up a list of grills that correspond to each controller.
2. Checking Internet Availability
- If the internet is detected, the screen will want to move towards the pairing process. If it is not the screen will display "No Internet Detected".
- If internet is detected move Pairing Phone to Grill.
- If internet is not detected, retry.
- If error repeats itself ensure internet is on and available.
- Exit app and retry.
- Phone WiFi Network = Grill WiFi Network. Make sure your phone is connected to the same network you want the grill to connect to.
3. Pairing Phone to Grill
There are two ways to pair the grill to your device. Pairing can be done by scanning the QR code or pairing to the grill manually.
3.1 Pairing Using the QR Code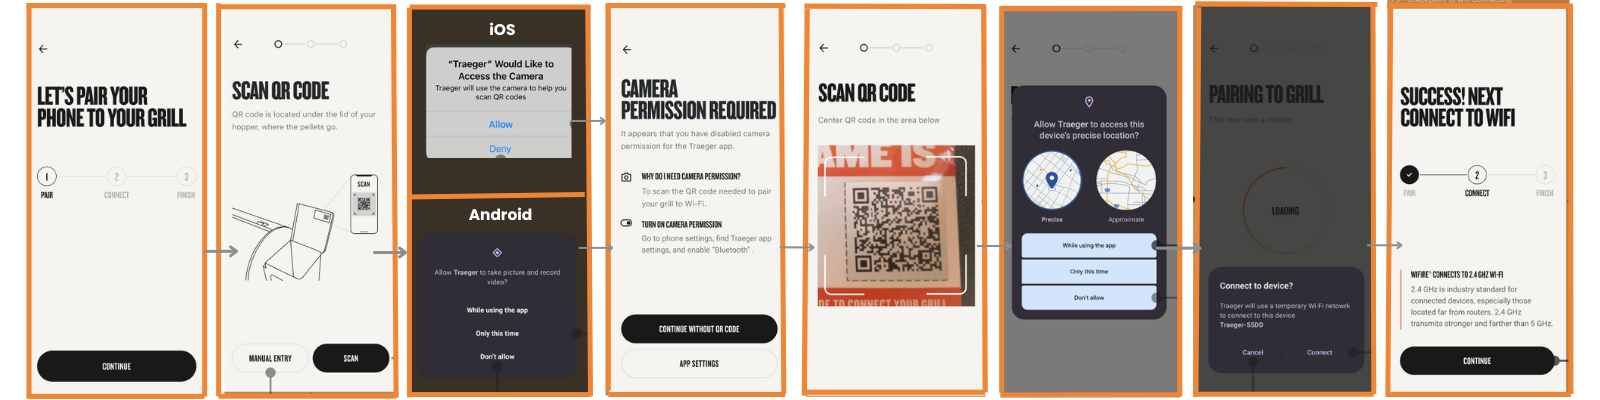
- Select the Scan button.
- Give the app permission to use the camera.
- Once the app has permission, it will use the back-facing camera to scan the code under the hopper lid.
- If denied or manually turned off location permission in phone settings, app will prompt that location permission is required to move forward.
- Allow Traeger to access the devices' location.
- The app will ask for permission to connect the grill to the device. Select connect to continue.
- If cancel is selected, the pairing process will end. A second prompt will pop up just to ensure this is what is to be done.
- App will begin pairing to the grill.
- Device pairs to the app and is ready to connect to WiFi.
3.2 Pairing Manually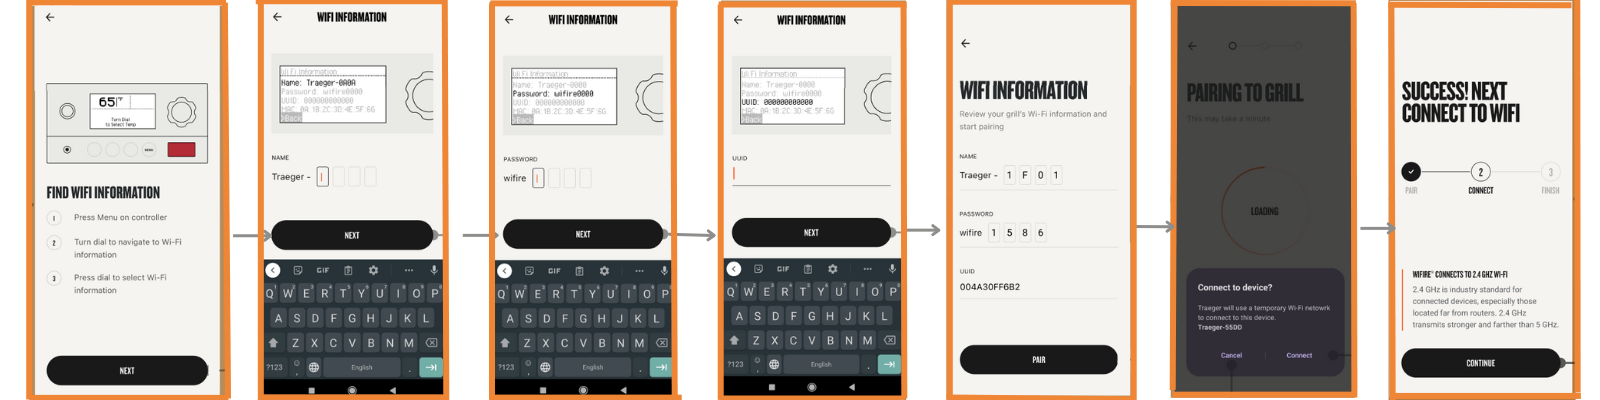
- Select Manual button.
- On the grill’s controller, select Menu > WiFi Information.
- Enter the corresponding information from the grill into the app.
- The app will ask for permission to connect the grill to the device. Select connect to continue.
- If cancel is selected, the pairing process will end. A second prompt will pop up just to ensure this is what is to be done.
- App will begin pairing to the grill.
- Allow Traeger to access the devices' location.
- Device pairs to the app and is ready to connect to WiFi.
- Success screen is displayed.
4. Connecting to WiFi
- Checking WiFi Connection.
- WiFi Found-If the phone is connected to a compatible network, the app will auto-select that network to connect to.
- Choose Your WiFi-If the phone is not connected to a compatible network or if the phone is not connected to a network, the app will populate a list of available networks to choose from. Select desired network.
-
Can't See Your WiFi Listed - If your network is not visible at all, it is most likely due to the following:
- Router and the grill are too far apart.
- You do not have your 2.4 GHZ network accessible if on a mesh network.
- You are on a 5 GHz network.
- If your network is not visible at all, select " Where is my network?". Follow the Tips for Missing Network below.
- Press connect button.
- Enter network password.
- App starts connection process,
- Grills connection complete. Move to naming grill and completing set-up.
5. Name Grill and Finish Set-Up
- Name your grill
- Create a nickname or select a pre-generated grill name.
Success! Grill is paired and connected. Start cooking.
Previously Paired Grills ONLY: Enter Serial Number
If you prompted to enter the serial number during the pairing process, take the following steps.
- Enter the serial number, which is located under the grill's hopper lid to proceed with pairing.
- What is this? Previously connected grills will perform a security check to determine if the grill is connecting to a different user's profile. If so (meaning there is a data mismatch), the user will be prompted to enter the grill's serial number.
-
Does the app spin when entering serial number?
- Power cycle and retry the pairing process.
- Can't Find Serial Number/Incorrect Serial Number: contact customer service.
Possible Errors Seen While Connecting
|
Connection Lost |
Grill Unable to Connect |
Signal Strength |
Something Went Wrong |
Could Not Connect to Traeger Cloud |
Could Not Connect to Home WiFi |
| Can't connect to grill; Grill is powered off; Phone loses Bluetooth connection with grill |
Can't connect to home WiFi network. Router off or out of range.
|
WiFi connection is < -80 dB. |
Unknown error. |
Could not get time from internet: Could not download certificate; -No IP from home WiFi; Grill timed out |
Could not reconnect to home WiFi, no internet on phone. |
| Exit and try again. Grill & app need to be restarted. | Try again or select help to go to Tips for Missing Network. | To increase strength, move router and grill closer. | Exit and try again. Grill & app need to be restarted. | Exit and try again. Grill & app need to be restarted. | Go to settings and to connect. |
If the app prompts magic word during the pairing process, please, contact customer service.
Tips for Missing Network
If the app is not able to find your WiFi network during the pairing process, here are some things you can do:
| Close the Gap | Are you on 5G? | Boost Connectivity | Magic Word: No Network |
Pairing FAQs
Q: Can I Connect/Pair While Seasoning?
- A: Absolutely! This process can be done while seasoning your grill. Just remember to let the seasoning process finish once you're done pairing your grill.
Q: Can I Connect/Pair via 5G Network?
- A: No. There must be a 2.4 GHZ network available in order to connect.
Q: Can I use the Traeger app on a different network than the one I used to pair my grill?
- Yes! After your grill is successfully paired to Wi-Fi, you can switch your phone to a different network, like 5GHz Wi-Fi or mobile data. Thanks to WiFIRE, you can control your grill from anywhere, anytime.
UNSUCCESSFUL PAIRING?
If the grill does not successfully pair, head to the appropriate troubleshooting article.