How to connect Touchscreen grills to WiFi and pair it with the Traeger app.
NOTICE
WiFIRE® Access May Be Lost
As of September 30, 2025, WiFIRE®-enabled grills that were not connected to WiFIRE® may have lost remote access due to a firmware update from our cloud partners. This does not affect manual grill operation using the controller.
Pre-Pairing Checklist
- Download the latest Traeger app from the Apple App Store or Google Play Store.
- Ensure your smart device is connected to the 2.4 GHz WiFi network to which you want your grill connected.
- Turn on your device's Bluetooth.
- Open the Traeger app and create an account or log in with your existing account.
- Station your grill as close to the nearest router as possible.
- Pro Tip: Check out our free Self-Help WiFi diagnostics app to check your connection strength and see if anything on your network may prevent you from connecting successfully!
- Plug in and turn on your grill.
How to Connect Your Grill to WiFi & Pair to the Traeger App
Review the Pre-Pairing Checklist above before starting the pairing process.
1. Select Your Controller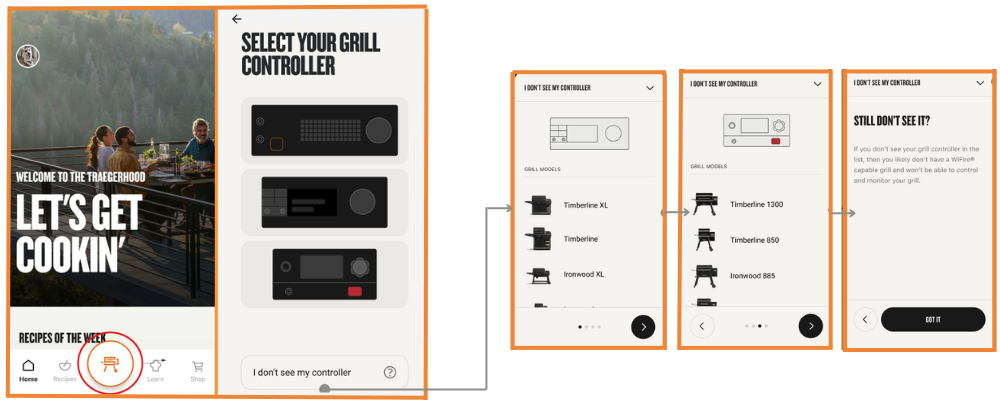
- Open the Traeger app.
- Tap on the grill icon, and select +Add Grill.
-
Select the controller that looks most similar to the one on your grill.
- Don't see your controller? Select, "I don't see my controller" to bring up a list of grills that correspond to each controller.
2. Pair Your Phone to Your Grill
Make sure your phone's Bluetooth is turned on and is connected to the 2.4GHz WiFi network you plan on connecting your grill to.
- Allow Bluetooth and location permissions.
- On the grill's controller, press the Menu button and navigate to WiFIRE Connectivity > Connect Grill. Press, Tap Here to Start Pairing to initiate sending its Bluetooth signal.
- App will search to connect grill.
-
Select grill to connect.
- Pairing request will populate.
- If canceled "Something went wrong" error will popup
- Pairing request will populate.
-
Security code prompt.
- Enter pin/passkey displayed on grill screen.
- If canceled "Something went wrong" error will popup.
- If incorrect code is entered "Something went wrong" error will popup. Retry.
- Success! Next connect to WiFi.
4. Connecting to WiFi
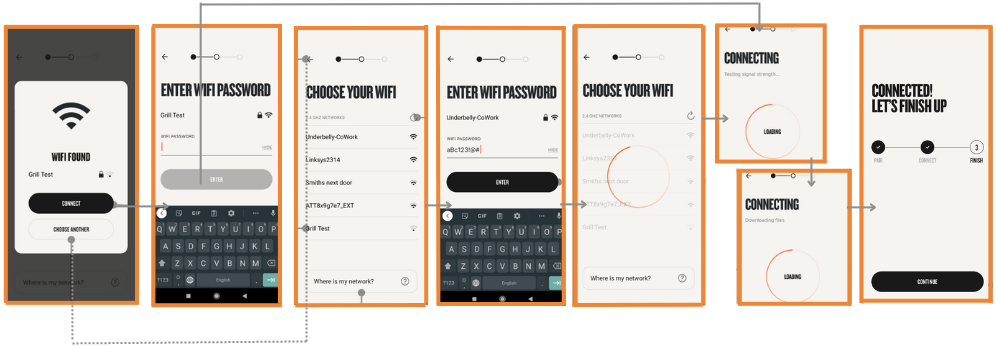
-
Checking WiFi Connection.
- WiFi Found-If the phone is connected to a compatible network, the app will auto-select that network to connect to.
- Choose Your WiFi-If the phone is not connected to a compatible network or if the phone is not connected to a network, the app will populate a list of available networks to choose from. Select desired network.
-
Can't See Your WiFi Listed - If your network
is not visible at all, it is most likely due to the following:
- Router and the grill are too far apart.
- You do not have your 2.4 GHZ network accessible if on a mesh network.
- You are on a 5 GHz network.
- If your network is not visible at all, select " Where is my network?". Follow the Tips for Missing Network below.
- Press connect button.
- Enter network password.
- App starts connection process,
- Grills connection complete. Move to naming grill and completing set-up.
5. Name Grill and Finish Set-Up
- Name your grill
- Create a nickname or select a pre-generated grill name.
Success! Grill is paired and connected. Start cooking.
Previously Paired Grills ONLY: Enter Serial Number
If you prompted to enter the serial number during the pairing process, take the following steps.
-
-
- Enter the serial number, which is located under the grill's hopper lid to proceed with pairing.
- What is this? Previously connected grills will perform a security check to determine if the grill is connecting to a different user's profile. If so (meaning there is a data mismatch), the user will be prompted to enter the grill's serial number.
-
Does the app spin when entering serial number?
- Power cycle and retry the pairing process.
- Can't Find Serial Number/Incorrect Serial Number: contact customer service.
- Enter the serial number, which is located under the grill's hopper lid to proceed with pairing.
-
No Bluetooth Passkey?
If while pairing the grill or accessories, you are not able to obtain a Bluetooth Passcode, take the following steps:
- Power off the grill
- Unplug the grill from the outlet.
- With the grill unplugged, press power button once.
- Let the power drain for one minute.
- After one minute, press power button again.
- Plug the grill back into the outlet.
- Power on the grill.
- Wait for the display to turn back on; can take 5 minutes.
If the grill gets stuck on the "Checking WiFi Connection" or the "Searching for Grill" screens during the pairing process and the grill is unable to pair, follow Stuck on Checking Connection or Searching for Grill Screens - Touchscreen Grills.
Possible Errors Seen While Connecting
|
Connection Lost |
Grill Unable to Connect |
Signal Strength |
Something Went Wrong |
Could Not Connect to Traeger Cloud |
Could Not Connect to Home WiFi |
| Can't connect to grill; Grill is powered off; Phone loses Bluetooth connection with grill |
Can't connect to home WiFi network. Router off or out of range.
|
WiFi connection is < -80 dB. |
Unknown error. |
Could not get time from internet: Could not download certificate; -No IP from home WiFi; Grill timed out |
Could not reconnect to home WiFi, no internet on phone. |
| Exit and try again. Grill & app need to be restarted. | Try again or select help to go to Tips for Missing Network. | To increase strength, move router and grill closer. | Exit and try again. Grill & app need to be restarted. | Exit and try again. Grill & app need to be restarted. | Go to settings and to connect. |
If the app prompts magic word during the pairing process, please, contact customer service.
Tips for Missing Network
If the app is not able to find your WiFi network during the pairing process, here are somethings you can advise the customer to do.
| Close the Gap | Are you on 5G? | Boost Connectivity | Magic Word: No Network |
Pairing FAQs
Q: Can I Connect/Pair While Seasoning?
-
- A: Absolutely! This process can be done while seasoning your grill. Just remember to let the seasoning process finish once you're done pairing your grill.
Q: Can I Connect/Pair via 5G Network?
-
- A: No. There must be a 2.4 GHZ network available in order to connect.
Q: Can I use the Traeger app on a different network than the one I used to pair my grill?
- Yes! After your grill is successfully paired to Wi-Fi, you can switch your phone to a different network, like 5GHz Wi-Fi or mobile data. Thanks to WiFIRE, you can control your grill from anywhere, anytime.
Unsuccessful Pairing
If the grill does not successfully pair, head to the appropriate troubleshooting article.